Air tightness

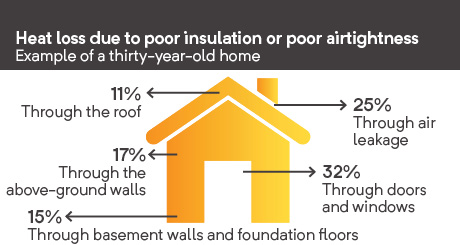
A house that is not airtight can raise your heating bill by up to 15% a year, and can cause premature deterioration of the house caused by humidity. Doors, windows and any cracks should be properly sealed. Caulking and weather stripping are low-cost remedies to such problems.

Make a list of air infiltration sites

If you take the time to detect and list places where outside air infiltrates your house, it will help you effectively solve the problem. 

How can I detect air leakage?

Here are two methods for detecting air leaks.

MethodsDescription
Flicker test

This simple method consists of slowly moving a lit candle or a thin piece of tissue paper along the inside walls at the strategic points mentioned below. The flickering flame or smoke, or the trembling sheet of paper, indicates an air leak.

Turning on all exhaust fans (kitchen range hood, dryer, central vacuum cleaner, bathroom exhaust fan) will help locate the leaks more quickly and accurately.

Blower door testThis is a more sophisticated method. A blower door device (fan) is used to create artificial depressurization inside the house so as to simulate high wind conditions. The air penetrates through holes and cracks in the house, which makes it possible to identify the specific points of air infiltration.

The energy evaluation of Renoclimat program includes a blower door test that pinpoints and measures air entering the house from the outside. The test also indicates any leaks to the outside, i.e. warm and humid air leaking out of the house.

Strategic points to inspect when making a house air tight

List of strategic points to inspect:

  • attic access hatch (trapdoor) and ceiling lights;
  • entry points for components that run through the ceiling to the attic (wiring, plumbing pipes, ventilation ducts, etc.);
  • doors;
  • exhaust fans (kitchen range hoods);
  • mail slots;
  • the joint between the wall sole plate and the end joists at the outer edge of floors;
  • inlets in exterior walls for conduits, wiring and pipes;
  • the floor drain;
  • cracks in the foundation;
  • embedded fixtures (recessed lighting, electrical outlets, light switches);
  • windows;
  • chimney.

On the hunt for air leaks!

Do you know where the air leaks are in your home? In a house that is not airtight, they are numerous and well hidden. By participating in the Rénoclimat program, an advisor will help you detect them during the visit

What can happen if a house is not airtight?

  • Infiltration of cold air coming from outside greatly diminishes the comfort of your house and increases your heating costs.
  • The warm air seeping from the house (exfiltration) is loaded with humidity that can create hidden condensation problems inside the building envelope. It can damage the insulation, produce mold and cause the wood framing to rot.

Air tends to leak through the following weak points in the envelope of your house:

  • the joints where the exterior walls meet the foundations, the floors, the ceilings and interior stud walls;
  • the joint where the interior stud walls meet insulated ceilings;
  • the joint where a door or window frame meets the exterior wall, and the joint between the glass and the window frame;
  • wherever wires or pipes run through exterior walls and insulated ceilings (ceiling lights, electrical outlets, light switches, exhaust fans, fresh air intakes, plumbing pipes or the main electrical service panel).

What are the rules to follow to ensure an airtight house?

  • Install the air barrier material in seamless, continuous fashion to prevent any passage of air through the building envelope. A lack of continuity in the air barrier will allow cold air to penetrate the insulation, which will diminish its insulating capacity.
  • Install the vapour barrier material in continuous fashion on the warm side of the insulating material. The vapour barrier prevents humid air and moisture from penetrating colder zones. Without the barrier, the humidity could cause condensation and mold to form.
  • Seal the perimeter of any object (ceiling light, electrical outlet, light switch, fan, dryer outlet, fresh air intake, electrical entry conduit, plumbing entry pipe, etc.) that runs through either the air barrier membrane or the vapour barrier membrane to ensure their integrity.
  • When choosing a sealant, keep the specific nature of the site to be caulked or sealed and the climate conditions in mind. Also take into consideration the cost of the sealant, as well as its resistance, adherence, elasticity and ease of installation.
  • Start by caulking and sealing the interior in order to stop leakage of warm air to the outside. Then continue sealing leaks from the outside to prevent rain water from infiltrating into the exterior walls. Install weather stripping around doors and windows.

Seal leaks from attic to basement

Air that is leaking to the outside can cause condensation problems and damage the insulation and wood framing of the house. Since air leaks tend to rise upward, start by caulking and sealing the top of the house and rooms with the highest moisture content such as the bathroom.

Caulking requires a clean surface

For best results, the joint to be sealed must be clean. Remove any paint, dust and old putty using a putty knife or screwdriver.

Tips for improving airtightness of foundation walls

A cracked or damaged joint between the concrete foundation walls and the wood framing is often the cause of direct infiltrations which increase heating bills and reduce the comfort of your house. During construction, it is relatively easy and inexpensive to place a compressible sheet under the foundation sill to prevent cold air from seeping in underneath the ground level floor.

It is possible to correct this defect in an existing house, but it calls for careful attention. Start indoors by sealing each joint with an acoustic sealant. If you are doing major repairs to the exterior cladding of the house, it is recommended to seal the cracks between the concrete and the wood with the same type of sealing product before installing the new siding.

Once your house is airtight, it’s time to insulate the top part of the concrete wall and the edge beam to prevent any direct contact between cold air and the wood framing. A wide range of different materials provides satisfactory results. Mineral wool batt insulation is the easiest to apply. Cut the insulation to the exact size required and place the pieces into position loosely, without packing them too tightly. Cover the insulation with a polyethylene vapour barrier and seal the joints of the membrane with the appropriate adhesive tape. You can also use polyurethane foam, but it must be coated with fire- retardant material.

Share this page


Ministère de l’Environnement, de la Lutte contre les changements climatiques, de la Faune et des Parcs

© Gouvernement du Québec, 2008-2024